What you find on this page:
A 3-way switch is commonly used as an on/off mechanism for the lights when installing light fixtures. Three-way switches allow you to toggle light fixtures on and off from 2 locations instead of one. A 3-way switch can also be combined with a four-way switch to control a light fixture from increased locations.
3-Way Switch Stopped Working: Here Are The Solutions
Electronics degrade over time and circuits can be weakened or damaged, among several other potential factors. 3-way switches can experience issues on or along the wiring that connects them. The problems that 3-way switches experience can vary along with the many ways you can arrange a 3-way switch. If your 3-way switch stopped working, there are solutions to get things up and running.
The Switch Is Defective
Sometimes the wires for your light fixture can be perfectly fine, but the switches are faulty. An excellent way to assess if you have a defective switch is to toggle each switch off. Then, if one switch works just fine and the other doesn’t, you’ll know which is faulty.
Once you can identify the faulty switch, you can diagnose the problem with that specific switch after turning off the power to that particular light fixture from your home’s circuit breaker. Then, after you cut the power, you can safely detach the switch from the wall to examine the switch’s terminals and other mechanisms.
Switches Turning Lights on and Off
Sometimes your light fixture suddenly turns off without toggling the switches. A switch turning on or off on its own can signify numerous issues, including but not limited to moisture, faulty springs, bad wiring, a bad bulb, or a defective switch.
Many light switches utilize a spring to open and close the circuit when you toggle the switch. Unfortunately, this spring mechanism will slowly wear down over time with prolonged usage. If a faulty spring is the cause of the problem, you’ll need to replace the spring mechanism.
A defective switch can snap on and off randomly if the mount is weak or not lined up correctly. In such circumstances, you can’t just replace a single component, such as the spring mechanism.
Moisture can also cause severe damage to your electrical wiring. Your light switches could be exposed to varying degrees of moisture depending on where you live or if you have a leak in your home.
One of the Switches Is Faulty
When diagnosing the problem of a specific toggle switch on your 3-way switch, you should not have to disconnect the wire connections to identify the problem. Instead, the next step is to use a continuity tester on the faulty switch.
A continuity tester can quickly identify if your 3-way switch is experiencing a circuit issue or an issue with a faulty spring mechanism, as these problems will be apparent from the indication of the tester.
Wires Are Not Properly Connected
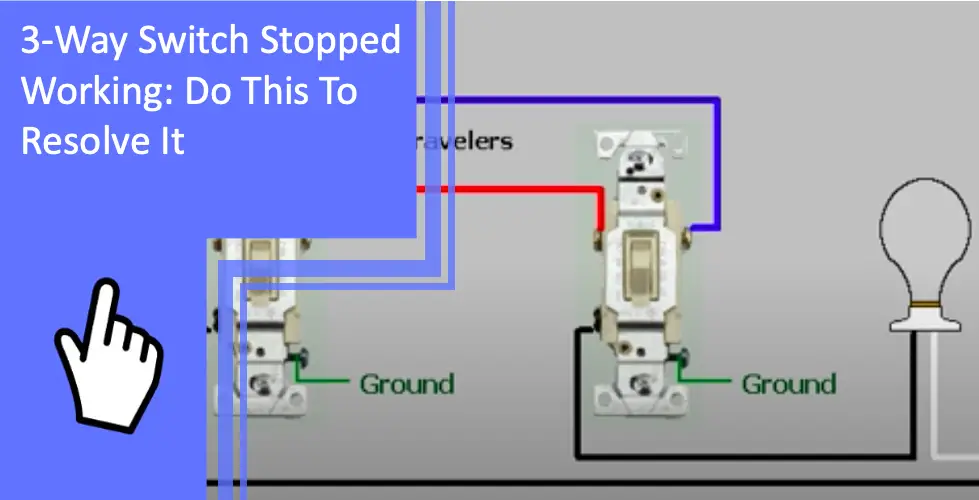
There are several components in a circuit wiring for a 3-way switch. Traveler wires allow the current to flow from one switch to the other. These wires provide alternative pathways for the electric current and have many key factors that make them identifiable. Red and black are commonly used to indicate the set of traveler wires in a 3-way switch. These traveler wires connect to traveler screws, or terminals, at the end of each switch.
Your 3-way switch also has a ground terminal and wire, commonly indicated with the color green or yellow. Ground wires are installed for safety purposes and run along the entire circuit of your 3-way switch.
The last type of terminal in your switch boxes is the common terminal, where your hot wire is connected to power the entire circuit. From the original connection at the common terminal, the hot wire will utilize a traveler terminal to run to the next switch box or ceiling box until it ends at the furthest object.
When wires are connected to each other by these traveler terminals, they are connected to the same corresponding terminal as one. These related connections make each wire in your 3-way switch circuit easy to identify at each outlet of the circuit so you can quickly examine the connections of the same wire.
How To Replace Defective Switch
If your issue is a defective switch, it’s important to remember the proper safety precautions you must take before proceeding to replace the switch. Replacing a bad switch is a relatively simple task that you can do with just a screwdriver and a continuity tester.
First Turn Off the Power on the Circuit Breaker
Before removing the cover to your switch handle’s switch box, try removing power from that circuit entirely with your home’s circuit breaker. After you cut the power, you can proceed to remove the wall cover screws so that you can detach the switch handle from the wall.
However, before touching the switch handle, it’s a good idea to test the terminals of the switch with a continuity tester so that you will be absolutely sure that there is no electric current.
Go to the Three Switches and Remove Them
Suppose you’re unsure which switch is defective. In that case, you can repeat this process for the other switch to expose both switch outlets and their corresponding terminal connections.
Identify and Mark Each Wire
All of the wires in the 3-way switch circuit can be identified by which terminal they are connected. The arrangement of the wires should correspond to the other switch box, and the terminals and wires should be color-coded to identify which wire is which quickly.
A helpful tip when replacing a defective switch is to take a picture of the wire arrangement of the original switch so that way you can use it as a reference when installing the new switch handle. Of course, your new switch handle will need to match the wire arrangement of the original exactly.
You Need a Continuity Tester
A continuity tester is essential before and after the switch handle replacement. Firstly, you need the tester to ensure it is safe to detach the old switch handle from the wiring. Secondly, you’ll need the tester once you have successfully installed the new switch so you can test if the wire connections still create a circuit.
Find the Live Wire
The live or hot wire is how you connect your 3-way switch to the rest of your home’s electrical system, which leads back to the circuit breaker.
Install New Switch
Once you have identified the proper arrangement for the wire connections to the corresponding terminals, you should be all set to disconnect the wires from the old switch handle and install them into the new switch. If you wire the new 3-way switch incorrectly, the circuit will not function properly and could easily lead to a short circuit in your 3-way switch.
Attach the New Switch to the Wall
Once you’ve ensured that you connect all your wires to the correct terminals on your new switch handle, you should be all set to install the switch back into the wall and return the wall over to the switch box with your screwdriver.
3-Way Switch Only Works When One Switch Is On: Do this
If your 3-way switch only works correctly when one switch is on, then there is a problem with the wiring in the switch’s circuit. To fix this problem, you can troubleshoot by testing the wire connections on the switch boxes to determine where the problem is occurring. If you can’t find a clear issue with your wire connections or terminals, the problem may be in one of the switch handles, such as a faulty spring mechanism.
Conclusion
Three-way switches can stop working for numerous reasons. However, there are several methods that you can employ to identify the problem so that you can take the proper steps to fix it.
Nevertheless, electrical work is a complicated trade. You should always call a professional if you feel unsure of how to resolve an issue with your 3-way switch to ensure your own safety.
Frequently Asked Questions
Do you still have questions about your 3-way switch that stopped working? Here are some answers to the most frequently asked questions.
When troubleshooting a defective switch, follow these steps:
– Turn off the power at the circuit breaker and remove the switch’s cover plate.
– Test each terminal using a voltage tester.
– Ensure the wires are all securely connected to their terminals
– If wires are loose or disconnected, resecure them, replace the cover plate, and turn the power back on at the breaker. Try turning the switch back on.
– If the switch still doesn’t work, repeat steps 1 through 3.
– Once you have reached the end of step 3, disconnect the black wires and twist them together. Connect them using a wire connector.
– Turn the power back on at the breaker.
– The switch is likely faulty if your light comes on and needs replacing.
To replace a defective switch, follow these steps:
– Turn off the power at the circuit breaker
– Remove the switch’s cover plate.
– Take out the switch
– Disconnect all the wires
– Connect the new switch
– Place the switch back into the electrical box
– Replace the switch’s cover plate
– Turn the power back on at the circuit breaker
– Test the switch
Yes, you can hook up a 3-way switch, enabling you to control a light from two locations.
Begin by toggling each switch until the light turns on. From there, you can toggle one of the switches to test if the light does on and off. It is a good switch if it does. Leave the light on and proceed to toggling the other switch. Test if this switch will turn on and off the light. If it works, this is a good switch, and the other is faulty.
To ensure safety, begin by cutting power at the circuit breaker. From there, remove all three wires from your 3-way switch. Next, join the wire from your common lug to the switch leg of your 2-way switch. Join the traveler leg to the power leg of your 2-way switch. Place all wires back into the electrical box. Replace the cover plate and switch screws.
If you wire your 3-way switch incorrectly, the switch will not operate as intended from both locations.
More related content
Arris modem lights blinking? Find solutions
Troubleshooting Light Switch: Find the Solution Here